
Learn how to make easy Valentine cake pops with the Babycakes cake pop maker. These treats on a stick make cute DIY bite-sized desserts, they're the perfect recipe for kids, and they're so much fun to make!
When I started out to make these Valentine's Day cherry chip cake pops, I wasn't even sure how to go about making them 'til I did a little research. Now I'm thinking up all kinds of themes and ideas for cake pops, case in point, the Truffula Tree cake pops I made for Earth Day.

There are a couple ways to make cake pops, including this how to make cake pops tutorial over on A Beautiful Mess; their cake pops look absolutely delicious.
However, while at Michaels one night, I found the Babycakes Cake Pop Maker on sale, so I decided to snatch one up and start making cake pops. I started with these lovely Valentine's Day cake pops.
Ingredient and Supply Notes
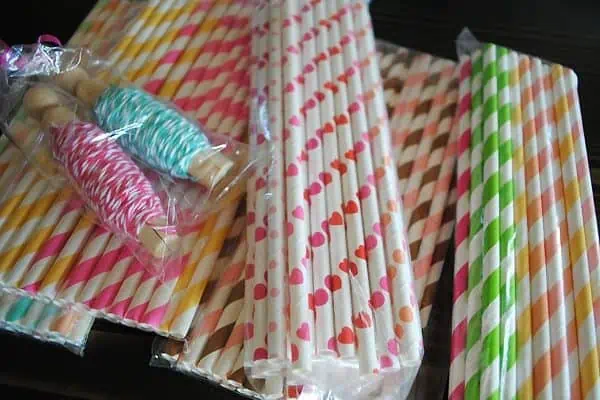
The first thing you want to do is gather all your supplies, including cake pop sticks and a cake pop holder.
- Cake Mix – You can use any flavor you like; I especially love cherry chip, but you can also make white, yellow, strawberry, chocolate, red velvet, etc. If you want pink or red Valentines cake pops, strawberry, cherry chip, or red velvet are the way to go.
- Large Eggs
- Vanilla Pudding Mix – Make sure it's an instant pudding mix, not the cook type.
- Whole Milk
- Cooking Spray – to lightly spray the griddle in your cake pop maker.
- Candy Melts and Sprinkles – for decorating. I especially love these dye free nonpareils from Watkins.
- Cake Pop Sticks – You can find an abundance of super cute paper straws on Etsy; they work really well as cake pop sticks.
- Cake Pop Stand – You'll need a cake pop holder to hold the cake pops while they set up after dipping. Wilton makes an affordable cake pop holder.
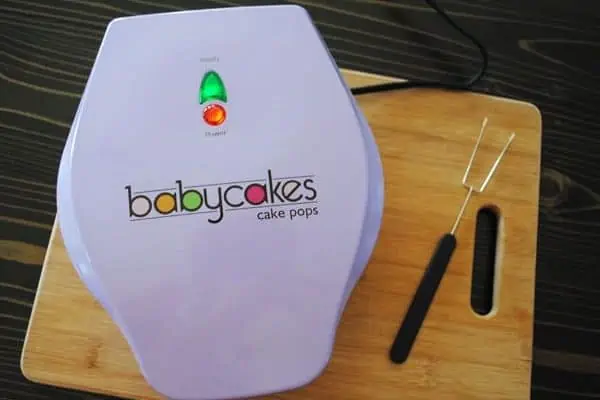
- Babycakes Cake Pop Maker
How to Make Valentine Cake Pops
There are 2 steps to making Babycakes cake pops… Baking and decorating.
How to Bake Cake Pops
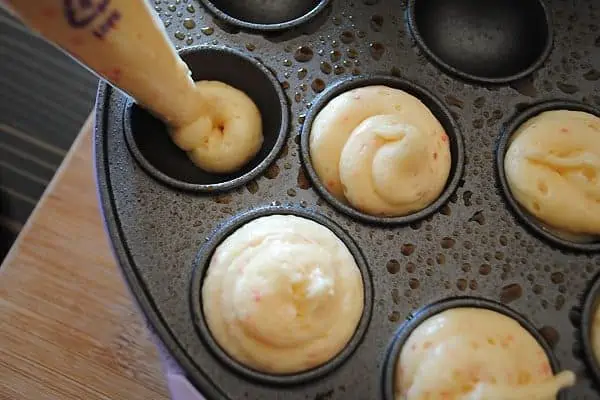
- Mix the cake mix with the eggs, pudding mix, and milk.
- Then add a little bit at a time to a pastry bag; this will make for easier filling of the cooking reservoirs in the cake pop maker.
- Heat up the cake pop maker, and wait for the green light to show that it's ready.
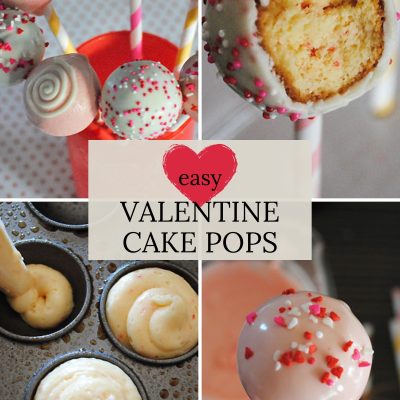
- Give a light coating of cooking spray to each reservoir in the cake pop maker; then fill each cooking reservoir with about 1 tablespoon of cake batter, trying not to overfill. If you overfill, instead of a round cake pop “planet,” you might end up with “Saturn.” I love using the cake pop maker because it shapes the cake pops for you, as long as you fill the reservoirs appropriately.
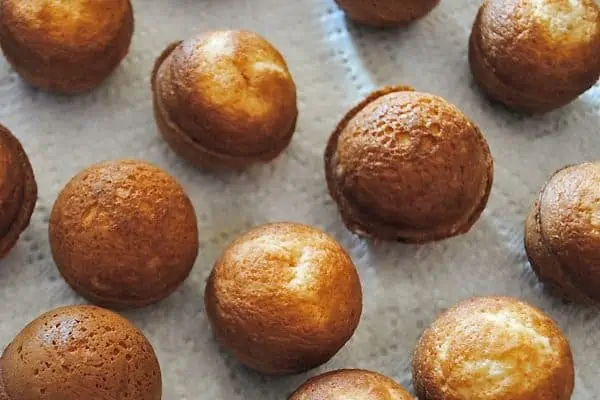
- Lower the lid on the cake pop maker, latching it shut. Now it's just a waiting game, about 4-6 minutes per batch of cake pops. Definitely use a pot holder to lift the lid because it can be quite hot to the touch. When done, you should have nice, round cake pops.
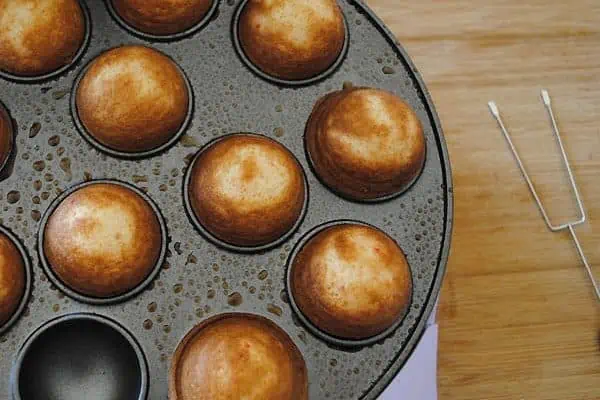
- The cake pop maker comes with a fork, so you can easily remove the cake pops and place them in a spot to cool.
How to Decorate Valentine's Day Cake Pops
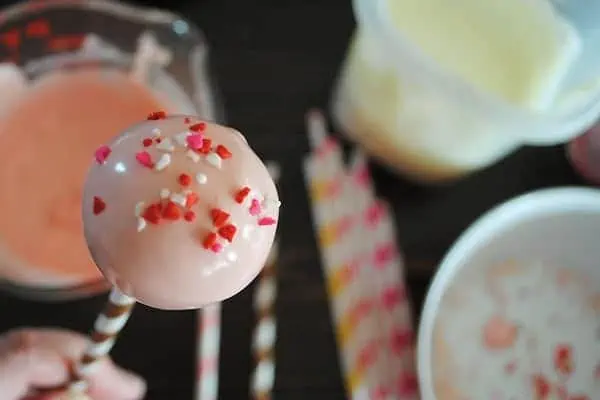
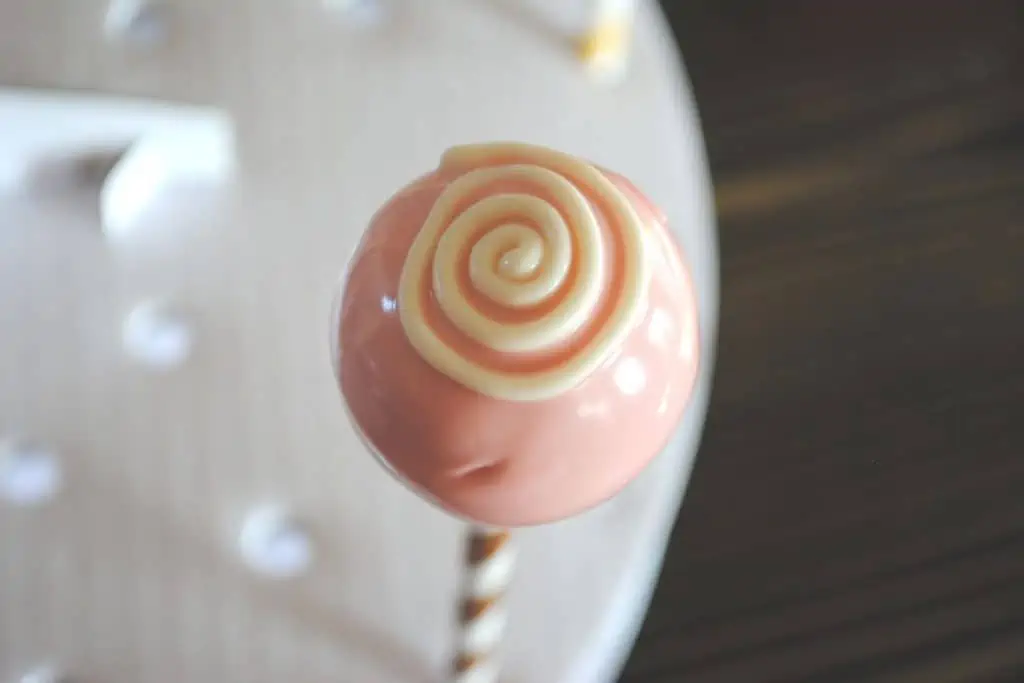
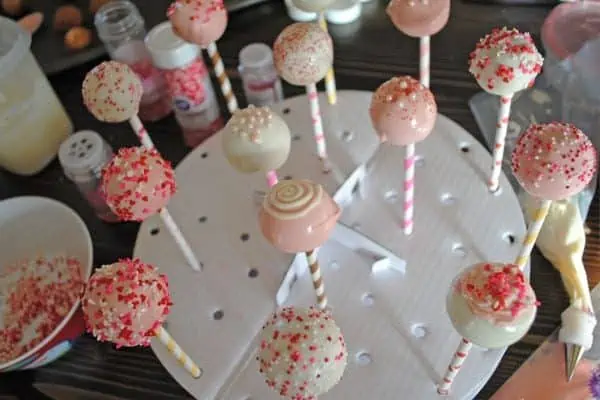
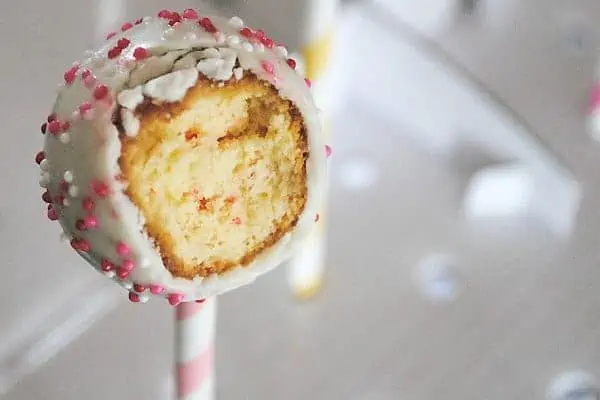
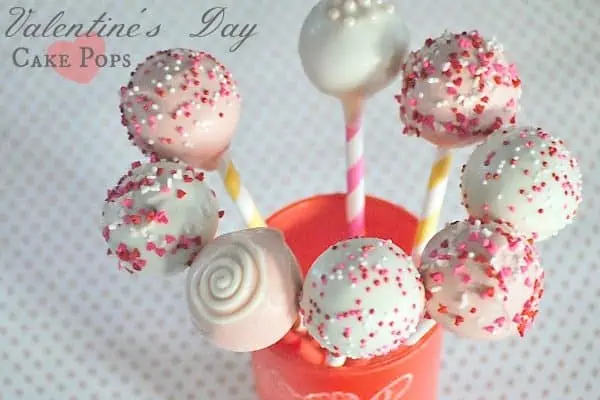
To decorate your cake pops, use candy melts and sprinkles of your choice. I really like pink and white candy melts for Valentine's Day.
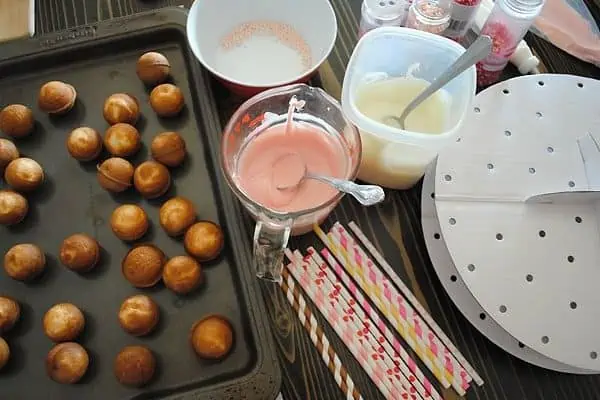
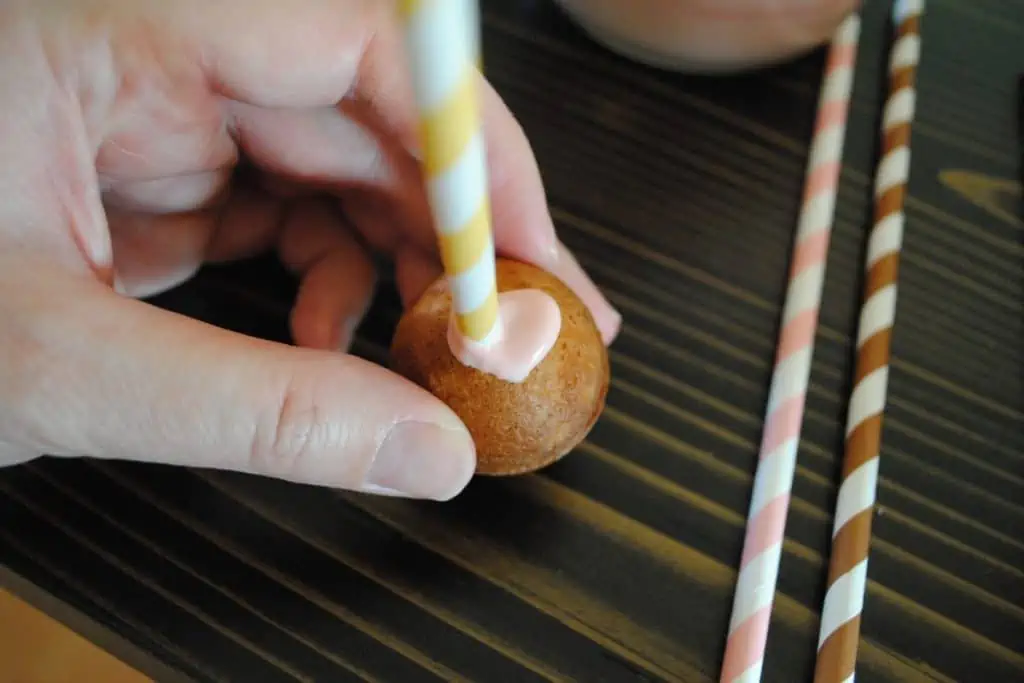
- Before decorating, it's a good idea to place the cake pops in the freezer for just a few minutes; this helps to dip them easier without a crumbly mess.
- Melt the candy melts according to the directions on the package. I usually start at 1 minute, then stir and switch to 30 second intervals, stirring between every interval.
- Remove the cake pops from the freezer and start decorating. Take a cake pop stick, dip it in the melted candy, and insert it into the cake pop.
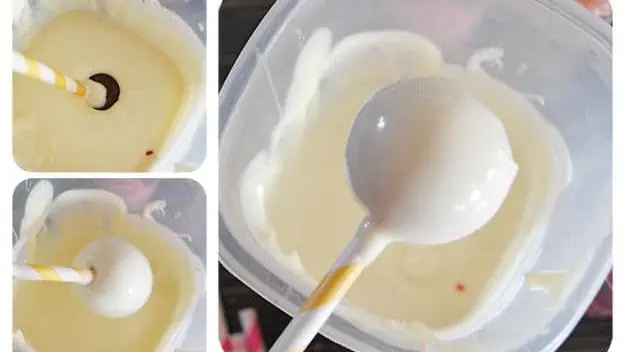
- Then dip each cake pop into the melted candy, coating well, and allowing excess candy to drip before placing upright.
- Decorate with any type of sprinkles you desire; I use different types of Valentine's Day sprinkles and colored sugar.You can also alternate colors with the candy melts; I put a bit of the melted candy in pastry bags, so I can add decorative touches, like little swirls, here and there.
- Then place each cake pop into a cake pop holder. Let the cake pops dry, and then serve.
We're usually not huge cake eaters, but my guys really liked these; each cake pop is such a small serving and makes a nice sweet treat.
Expert Tips and Recipe FAQ's
Confessional Tip: On my first try, my batter looked normal, but my cake pops were turning out to look like nipples (I'm not even kidding). So, off to experiment and try again; I eventually learned the batter needs to be almost as stiff as brownie batter. When it's a stiff batter, it works like a charm!
Cake pops can be soft and crumbly. So it helps to freeze them prior to dipping, so they dip more easily. It also helps the melted candy to set up faster, so you can decorate more efficiently and quickly.
You can make them a couple days in advance. Like cake, cake pops can lose their freshness, so I'd only make them 1-2 days in advance for best quality, flavor, and texture. They should last for 1-2 days at room temp and 5-7 days in the fridge.
Depending on ingredients used, you can store dipped cake pops in an airtight container at room temperature for 1-2 days. If you're making them more in advance or with certain ingredients that require refrigeration, they need to go in the fridge; before you put them in the fridge, be sure to layer them on a paper towel or piece of parchment paper, in a single layer, in an airtight container. Then just remove them from the fridge a couple hours before the big event, so they can warm to room temp and soften.
More Delicious Valentine's Day Recipes
Valentine's Day is the perfect time for ideas, desserts, and sweet treats like these…
- Valentine marshmallow pops
- Valentine sugar cookie pops
- Heart shaped snack cakes
- Valentine Rice Krispie Treats with M&M's
These would be great served at a party or a celebration; they're also fun just to get creative with, maybe share a few with your neighbors. Enjoy!
If you try this recipe, why not leave a star rating in the recipe card right below and/or a review in the comment section further down the page? I always appreciate your feedback. You can also follow me on Pinterest, Facebook, Instagram, and YouTube. And subscribe to my email list too!
Valentine Cake Pops
Equipment
Ingredients
- 15.25 ounces cake mix any flavor you like
- 2 large eggs
- 3 ounces instant vanilla pudding mix
- 3/4 cup whole milk in place of water on cake mix pkg
- 12 ounces candy melts any color
- 1/2 cup sprinkles
Instructions
How to Bake Cake Pops
- Mix the cake mix with the eggs, pudding mix, and milk.
- Then add a little bit of the batter at a time to a pastry bag; this will make for easier filling of the cooking reservoirs in the cake pop maker.
- Heat up the cake pop maker, and wait for the green light to show that it's ready.
- Give a light coating of cooking spray to each reservoir in the cake pop maker; then fill each cooking reservoir with about 1 tablespoon of cake batter, trying not to overfill. If you overfill, instead of a round cake pop “planet,” you might end up with “Saturn.” I love using the cake pop maker because it shapes the cake pops for you, as long as you fill the reservoirs appropriately.
- Lower the lid on the cake pop maker, latching it shut. Now it's just a waiting game, about 4-6 minutes per batch of cake pops. Definitely use a pot holder to lift the lid because it can be quite hot to the touch. When done, you should have nice, round cake pops.
- The cake pop maker comes with a fork, so you can easily remove the cake pops and place them in a spot to cool.
How to Decorate Valentine's Day Cake Pops
- Before decorating, it's a good idea to place the cake pops in the freezer for just a few minutes; this helps to dip them easier without a crumbly mess.
- Melt the candy melts according to the directions on the package. I usually start at 1 minute, then stir and switch to 30 second intervals, stirring between every interval.
- Remove the cake pops from the freezer and start decorating. Take a cake pop stick, dip it in the melted candy, and insert it into the cake pop.
- Then dip each cake pop into the melted candy, coating well, and allowing excess candy to drip before placing upright.
- Decorate with any type of sprinkles you desire; I use different types of Valentine's Day sprinkles and colored sugar.You can also alternate colors with the candy melts; I put a bit of the melted candy in pastry bags, so I can add decorative touches, like little swirls, here and there.
- Then place each cake pop into a cake pop holder. Let the cake pops dry, and then serve.
Notes
Nutrition
(Disclosure: I was not compensated or provided product, in any way, for this recipe.)


Maybe I need to get one of those cake ball makers. I’ve tried it a few times without one and it was not pretty!! These are BEAUTIFUL!
Kristy, thank you! I love mine, but I’ll admit the ones made without the cake pop maker do taste more creamy. But these aren’t quite as rich; Dan actually likes them better. And it really does make it easy.
These are so cute! Pinned and sharing on Facebook tomorrow! Thanks for linking up Mel!
Trish, thank you so much! Thank you for providing the linky!:)
Your cake pops are gorgeous! This is an excellent tutorial as well. I thought cake pops would be really fiddly to make, but these look like fun :)
Thank you so much, April! Well, my first batch didn’t turn out so well, but once I got the batter right, they were much easier to do.:) They were a bit addictive to make; I’m ready to make more.:)
I was just thinking I should do something fun with the boys for Valentines day. I am going to have to try these! They look amazing. :)
Thanks so much, Whitney! They are a lot of fun to make.
Love love love the babycakes pop maker!!! I need more recipes under my belt… these look so good!
Thank you, Rachel! Yes, me too, I really like using it. It’s so quick and easy to make them, once the batter is mixed. I need more recipes too, thinking chocolate next time.:)